Bowties in Civil 3D Corridors: How to Fix Them Using Two Turning Lane Offsets
Introduction
If you’ve ever worked with Civil 3D corridors, you know that designing complex roads, rivers, or intersections can get messy fast. One of the most frustrating problems engineers encounter is the dreaded “bowtie” effect in corridors. These overlapping, twisted geometries can break your design, distort surfaces, and make your model unreliable.
In this article, we will dive deep into:
- What bowties are in Civil 3D
- Why they happen
- How to fix them using the Two Turning Lane Offsets method
- Tips to prevent bowties in your future projects
By the end, you’ll have a step-by-step workflow to create clean, professional, and reliable corridors.
also check Using Offset Assemblies in Civil 3D.
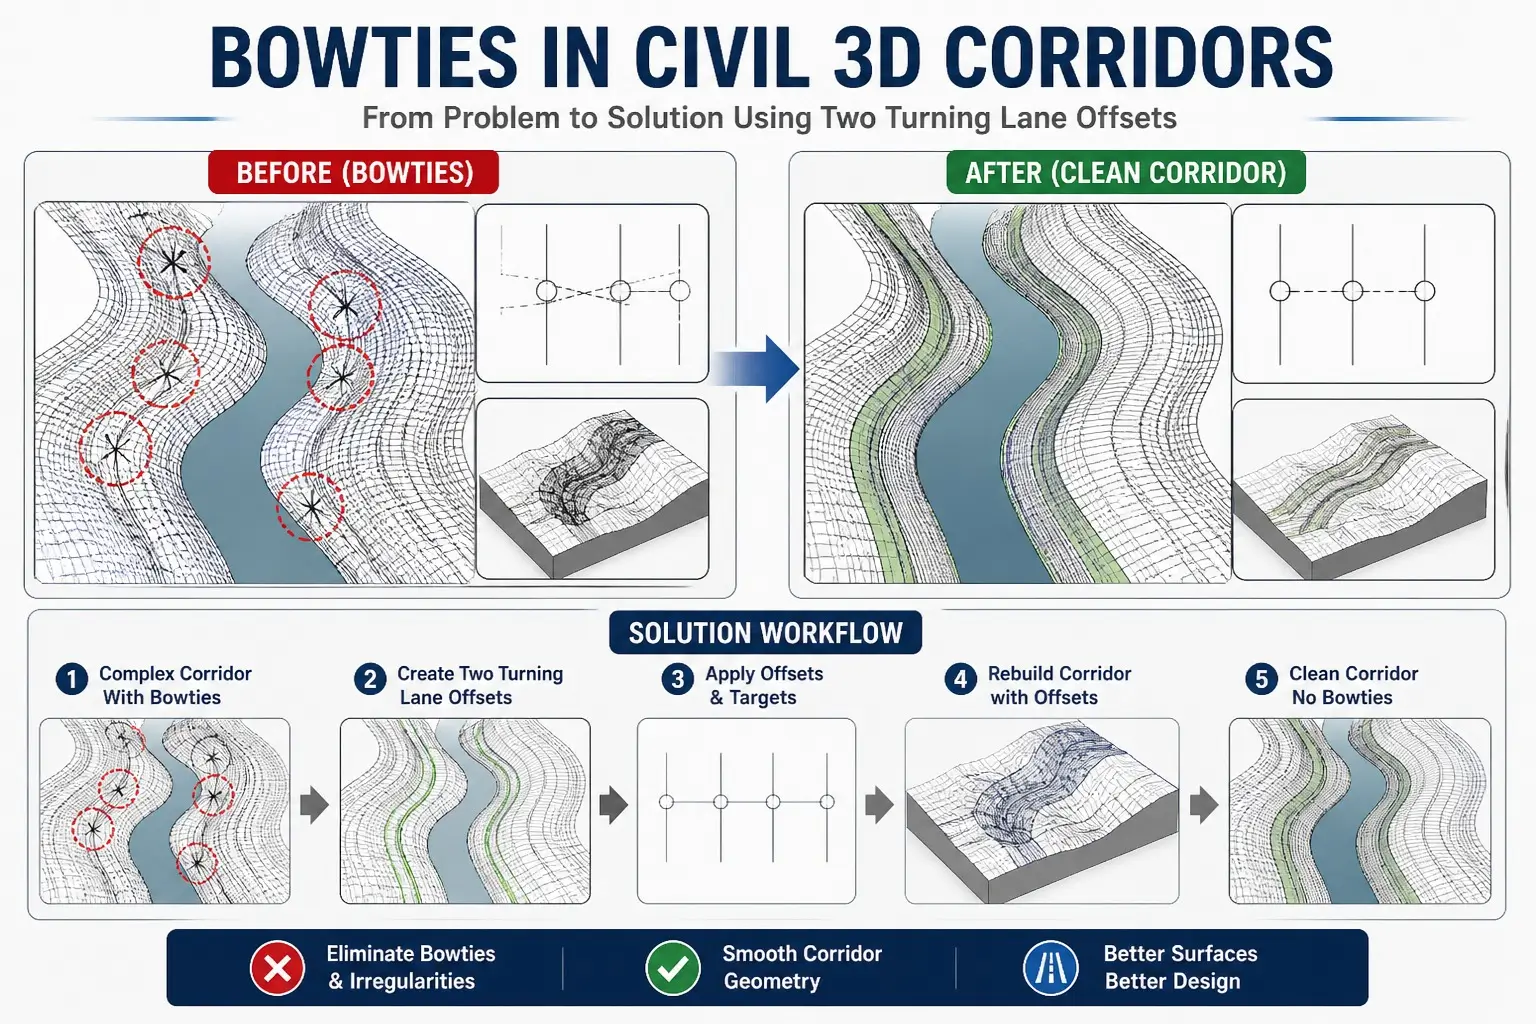
What Are Bowties in Civil 3D?
A bowtie occurs when corridor links cross over each other due to improper alignment or targeting. Essentially, your corridor is trying to do too much at once, and the geometry can’t keep up.
Signs of bowties include:
- Twisted or overlapping lines
- Distorted cross-sections
- Irregular or broken surface triangulation
Bowties are most common in:
- River corridors with irregular paths
- Intersections with multiple turning lanes
- Areas with sharp changes in geometry or elevation
Why Do Bowties Happen?
Bowties usually appear when corridor geometry is forced beyond its design limits. Common causes include:
- A single baseline attempting to control multiple changing directions
- Corridor targets not properly aligned
- Geometry that is too complex for one assembly
- Overlapping or intersecting turning paths
In simpler terms: your corridor is overloaded.
Real Problem Example
Before fixing bowties:
- River corridors show irregular, crossing links
- Surfaces become inconsistent and distorted
- Grading becomes inaccurate
- Corridor editing is difficult and error-prone
The Solution: Two Turning Lane Offsets
The most effective way to fix bowties is using Two Turning Lane Offsets. This approach separates complex geometry into manageable parts, ensuring clean surfaces and smooth alignment behavior.
Step-by-Step Workflow Using Two Turning Lane Offsets
Step 1: Create Separate Offset Alignments
Instead of one alignment controlling everything:
- Create one alignment for the left lane
- Create one alignment for the right lane
- Treat each as an independent path to handle turning and curvature
Step 2: Assign Profiles
Each offset alignment should have its own vertical profile:
- Ensures smooth elevation control
- Prevents surfaces from distorting
- Helps maintain proper grading
Step 3: Use Multiple Baselines in Corridor
In complex areas:
- Keep your main baseline for general guidance
- Add offset baselines for turning lanes or complicated sections
- This reduces overlapping and twisting
What Changes After Applying Offsets?
After implementing the Two Turning Lane Offsets method:
| Before (With Bowties) | After (Offsets Applied) |
|---|---|
| Overlapping links | Clean geometry |
| Distorted surfaces | Smooth surfaces |
| Irregular sections | Consistent sections |
| Hard to edit | Easy to control |
Your corridor becomes smooth, professional, and reliable.
Important Design Insight
One key takeaway: don’t fight bowties manually. Instead, restructure your corridor.
Redesign the corridor using offsets, and the errors will disappear.
Additional Techniques for Clean Corridors
Along with Two Turning Lane Offsets, consider:
- Using feature lines to control geometry
- Adjusting alignments to prevent crossing
- Rebuilding corridors after restructuring
- Fine-tuning targets for clean surfaces
These steps ensure that your corridor remains stable even in the most challenging designs.
When Should You Use This Method?
Use this method in situations like:
- Bowties are forming in your corridor
- Working on river or irregular paths
- Designing intersections with multiple turning lanes
- Corridor geometry becomes unstable or messy
Pro Tips for Civil 3D Users
If your corridor looks messy:
❌ Don’t try to fix it section by section
✅ Do fix the alignment logic using offsets
This saves hours of frustration and ensures professional-grade designs.
Final Thoughts
Bowties aren’t just design—they indicate that your corridor design needs restructuring. Using the Two Turning Lane Offsets method, you can:
- Simplify complex corridor geometry
- Eliminate overlapping issues
- Create smoother, more professional designs
Mastering this technique is essential for advanced Civil 3D corridor modeling.
Learn More with Civil3DPro
At Civildesign, we focus on real-world solutions that engineers actually need.
Follow us for:
- Practical tutorials
- Advanced corridor design strategies
- Civil 3D workflow hacks for clean, error-free models


One Comment